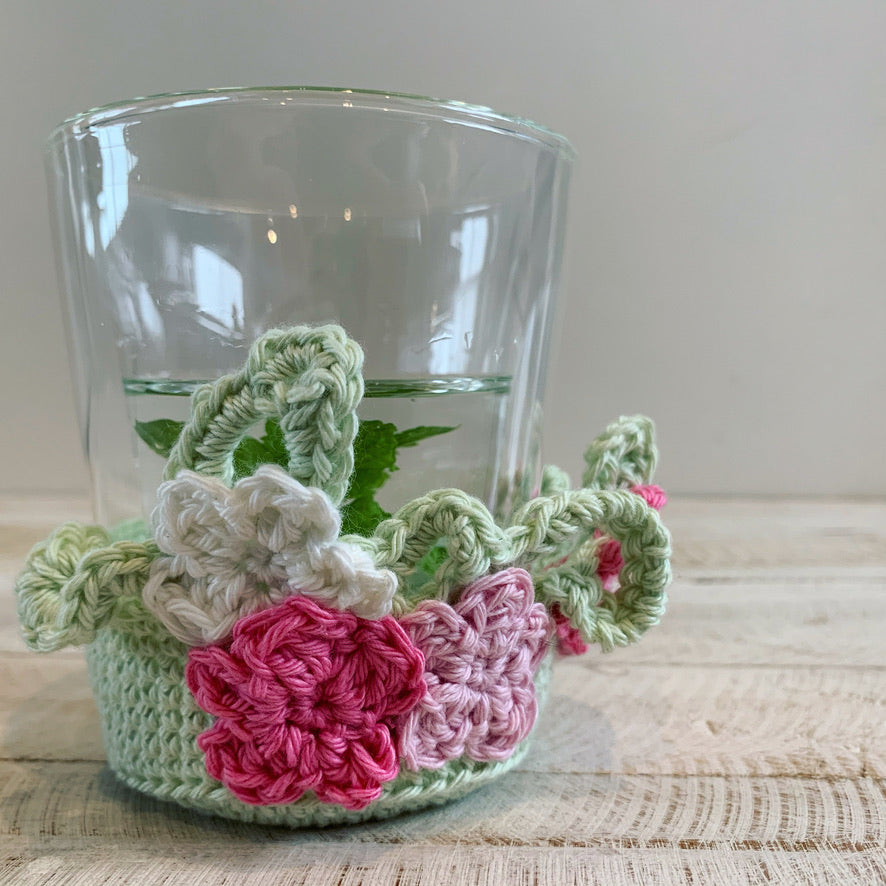
Climbing Vines Cup Holder
Andrea ClementsI often make things using freeform crochet techniques because I love the lack of uniformity and a little bit of chaos (it says a lot about me!).
Usually though I make things like shawls, scarves and other wearables. I have never written a pattern using this technique bur thought I would give it a go. It meant that I needed to actually take note as I created each element of the vines. I love the way the vines curl and creep around my glass!
You could extend the height of your Climbing Vines Cup Holder by adding a few more rounds after round 17.
I used Scheepjes Organicon for my Climbing Vines Cup Holder. It is 100% cotton, non-mercerised, is a fingering weight yarn and has some of the most gorgeous pastel tones. You could use any cotton though and if you are only making one Climbing Vines Cup Holder then you could definitely use up some yarn from other projects!
I used only small amounts of the following colours:
- 206 Soft Blossom (for flowers)
- 202 Soft Cloud (for flowers)
- 207 Apple Blossom (for flowers)
- 212 Sweet Apple (for the base of the cup holder and the vines)
I used a 3.5mm Clover Amour hook with the Organicon.
US terms used throughout.

Stitches used:
sc single crochet
blo back loop only
ch chain
st stitch
slst slip stitch
sk st skip stitch
3dc cluster 3 double crochet cluster.
Ch 3 acts as first dc, yarn over, insert hook into base of ch 3, yarn over and pull through.
Pull through 2 loops on hook (you should have 2 loops still on hook), yarn over, insert hook into same stitch yarn over and pull through, yarn over and pull through 2 loops on hook (you should have 3 loops still on hook), yarn over and pull through the remaining 3 loops.
Materials:
- 25g of cotton, fingering weight yarn in green.
- Small amounts of pink and white fingering weight cotton for the flowers.
- Scissors
- Stitch Marker
- Needle for weaving in the ends
Cup Holder and Vines:
The base:
Rows 1-17 are worked in the round, do not join at the end of the round.
R1: 6 sc into a magic ring (6)
R2: 2 sc in every st. (12)
R3: 1 sc in the next st, 2 sc into the next st repeat till the end of the round. (18)
R4: 1 sc in the next 2 st, 2 sc into the next st repeat till the end of the round. (24)
R5: 1 sc in the next 3 st, 2 sc into the next st repeat till the end of the round. (30)
R6: 1 sc in the next 4 st, 2 sc into the next st repeat till the end of the round. (36)
R7: 1 sc in the next 5 st, 2 sc into the next st repeat till the end of the round. (42)
R8: 1 sc in the next 6 st, 2 sc into the next st repeat till the end of the round. (48)
R9: 1 sc in the next 7 st, 2 sc into the next st repeat till the end of the round. (54)
R10: 1 blo sc in each st (54)
R11-17 1 sc in each st (54)
The Vines:
R18:
- ch 9, 1 sc in 3rd ch from the hook,
- 1sc in next 2 st,
- Sk 2 st. 1 sc in the next 5 st,
- Ch 12, 1 sc in 3rd ch from the hook,
- Sk 3 st, 1 sc in next 2 st,
- Ch 5, 1 sc in next 4 st,
- Ch 7, 1 sc in 3rd ch from the hook,
- Ch 5, 1 sc in next 3 st,
- Ch 3, 1 sc in next st,
- 1 sc in next st,
- 1 sc in next 30 st,
- Ch 5, 1 sc in 3rd st from hook,
- 1 sc in next 3 st.
R19: 1 sc in each st, fasten off and weave in ends.
Flowers (I made 5 but don’t be restricted by this, make as many as you like to decorate your vines):
R1: 5 sc into a magic ring, sl st into 1st sc. (5)
R2: 3dc cluster, ch1 (does not count as a stitch), sl st into next st repeat until you have 5 x 3 dc clusters. Sl st into base of 1st 3dc cluster and fasten off leaving a long tail for sewing. (5 clusters)
Attach your flowers to your Climbing Vines Cup Holder wherever works for you!

You are welcome to share the pattern, however please acknowledge that the design belongs to Yarn Me Calm respecting my rights as a designer, thank you!
If you have questions about this pattern, please contact me at
I hope you enjoy the pattern!
Andrea x