Wheelie Good Bag!
Andrea ClementsSome time ago my Nan asked me to make her a bag to hang from her walking frame. The bag didn't need to be large but needed to hold her mobile phone, glasses and possibly a book and needed to be accessible for her. So I got to making something that would fit the bill and she loved it! Nan got at least 12 months use out of that little bag before she was no longer able to use her walking frame.
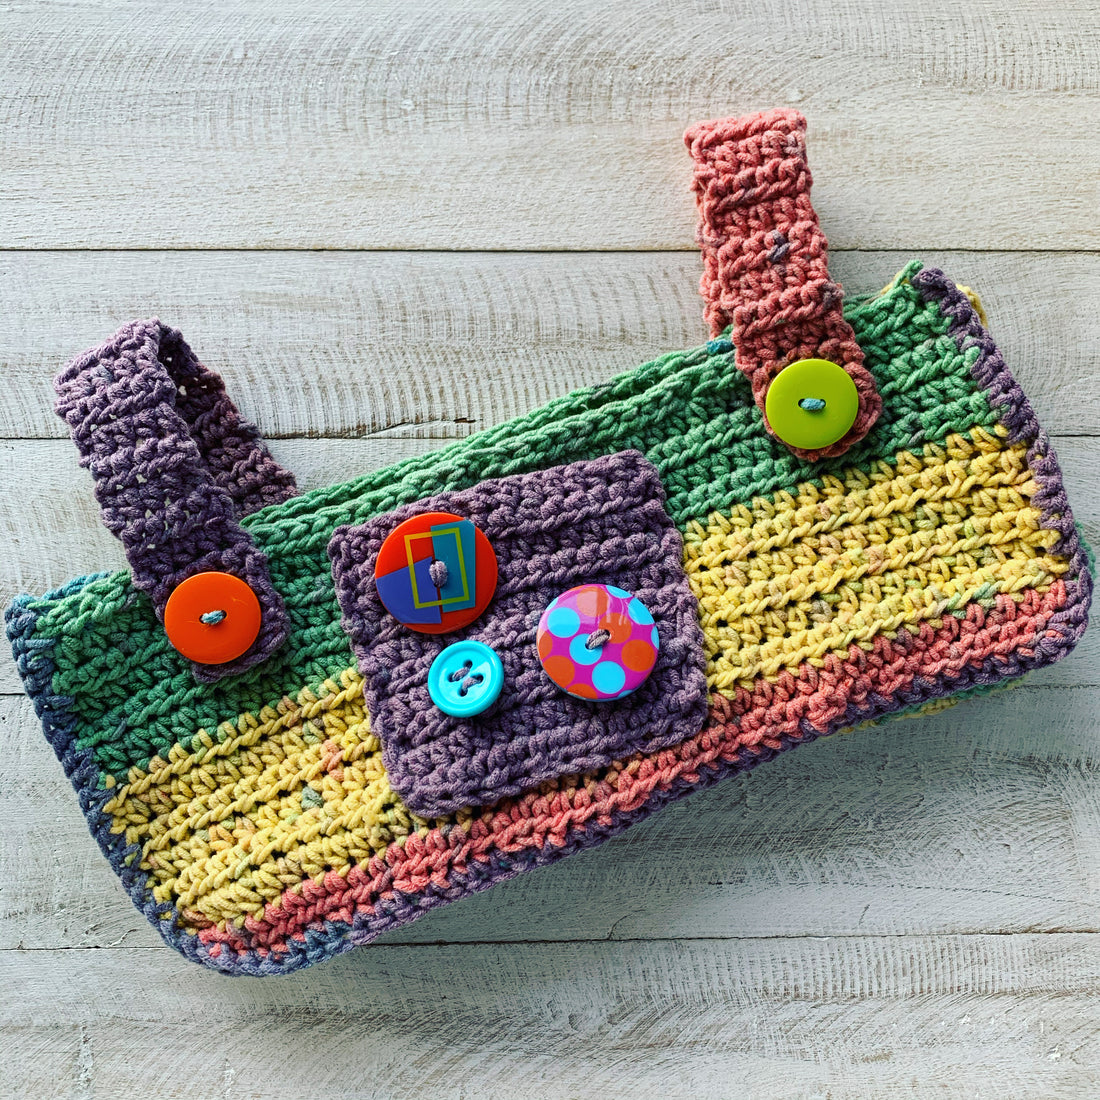
These days Nan is in a wheelchair and her little bag doesn't fit on the arm of the chair and whilst she has a bag for the bag of her chair, she can't reach it! So Nan has asked me to make a bag for her to hang from the arm of her chair so she has her mobile phone, glasses and other bits at hand. The dimensions of the bag were a bit tricky though because it couldn't be too deep!
The name for the Wheelie Good Bag comes from one of our amazing Yarn Me Calm Community members (thanks Melanie)!
I was given the following dimensions 260mm x 120mm and strap 150mm. This makes the bag wide but quite shallow though. I was worried that things would fall out of the bag due to the lack of depth so I created additional space by adding a gusset to widen the interior.
Nan loves bright colours so I decided to use a Caron Cotton Cake as it is easy to wash but comes in some fun colour ways too. I used one ball of colour way Calico Flowers.
They are 100g balls with nearly 200m on them.

What you need:
- 1 Caron Cotton Cake ball
- 4mm crochet hook
- scissors
- mini knit clips or pins (for holding pieces together while you join_
- 2 x 25mm buttons for the closures
- wool needle
- miscellaneous buttons or other notions for decoration
Stitches used (US Terms):
- Foundation half double crochet
- hdc - Half double crochet
- sc - single crochet
-
ch - chain
I said chain over instead of yarn over! This was take number 6 after having to redo it because the dogs kept barking so I decided to leave it there!!!
Panels (make 2)
Row 1:
40 foundation half double crochet.
Row 2:
ch2, 1 hdc in each stitch to the end of the row
Row 3 - 13:
repeat row 2 and cut yarn.
Joining Gusset (make one)
Row 1:
10 foundation half double crochet
Row 2:
ch2, 1 hdc in each stitch to the end of the row
Row 3 - 53:
repeat row 2 and cut yarn.
Pocket (make 2)
Row 1:
15 foundation half double crochet
Row 2:
ch2, 1 hdc in each stitch to the end of the row
Row 3 - 9:
repeat row 2 and cut yarn.
Straps (make 2)
Row 1:
5 foundation half double crochet
Row 2:
ch2, 1 hdc in each stitch to the end of the row
Row 3 - 20:
repeat row 2
Row 21:
Button Holes: ch 2, 1 hdc, ch 2, skip one stitch, 2 hdc
Row 22:
ch2, 1 hdc in each stitch to the end of the row and cut yarn.

Assembly:
- Sew one pocket onto the front of one of the panels.
- Sew the second pocket onto the wrong side of the other panel (this will be an inside pocket).
- Place one panel and the gusset together and single crochet around the edge to join. I used mini knit clips to hold them together so they didn't move while I joined them.
- Place the second panel together with the other edge of the gusset and single crochet around the edge to join. You should have both panels with right sides facing out with the gusset in between joining them and providing space between the panels.
- Place your two straps and sew into place.
- Sew the buttons for the closures directly under where the button holes on the straps line up on the bag.
- Embellish with more buttons or crocheted flowers or leave as it is!

You are welcome to share the pattern, however please acknowledge that the design belongs to Yarn Me Calm respecting my rights as a designer, thank you!
If you have questions about this pattern, please contact me at
I hope you enjoy the pattern!
Andrea x