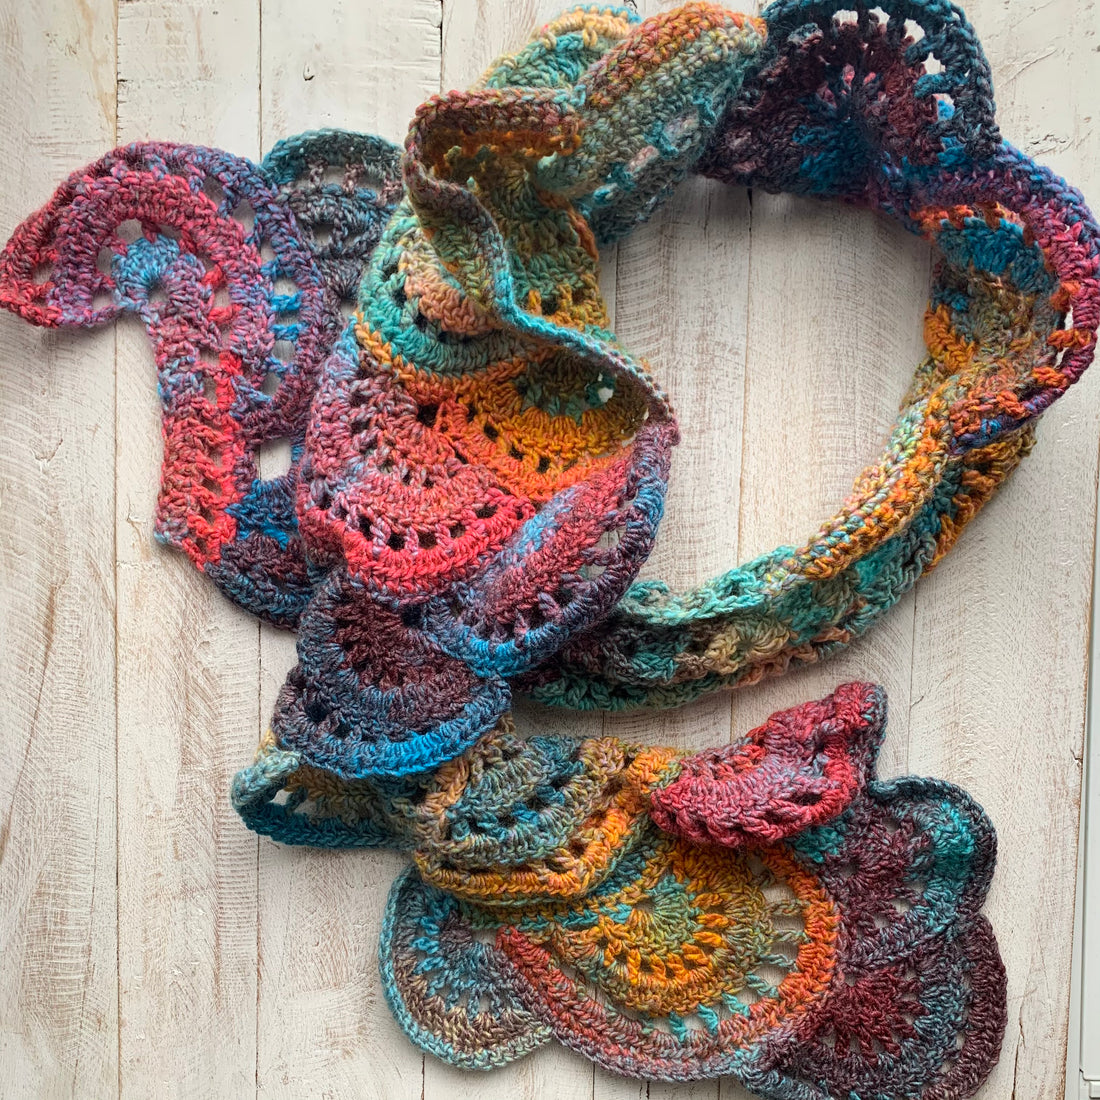
A little while ago I created this little motif after getting some gorgeous Red Heart Roll With It Melange into stock. It is one of those yarns that when you see it in the ball it doesn't really do the colours justice. I didn't have any clear plan in mind when I started playing with the yarn and just created a basic motif then joined as I went to create a scarf.
The placement, and the motif to a large degree, were quite freeform and I placed the motifs where I thought they looked good rather than following any sequence. This obviously makes it very difficult to write up as a pattern but after lots of requests I decided to give it a go so you can use it to make your own creation!

Originally I started with a foundation row but in hindsight I wouldn't do that again. I had hoped to create a straight edge at the bottom but once I started creating that didn't last long!
This yarn is an absolute joy to work with and I loved seeing the colours change as the scarf evolved with the absolute added bonus that I only used one ball!
What you'll need:
- 1 ball of Red Heart Roll With It Melange.
- 4.0 mm Crochet Hook
- Scissors
- Wool needle for weaving in ends
Single Motif UK Version
Stitches Used:
ss - slip stitch
ch - chain
sk - skip stitch
st - stitch
dc - double crochet
htr - half treble crochet
tr - treble crochet
Row 1:
Ch 5 and join with a ss to the first ch.
Row 2:
Ch 3 (counts as first tr), 11 tr into the ring, (12)
Ch 5 (counts as 1 tr & 2 ch) turn
Row 3:
1 tr, ch 2, repeat to end of row finishing with 1 tr in the last stitch. (12)
Ch 3 (counts as first tr) turn.
Row 4:
2 tr in each ch 2 space space, 1 tr in top of ch 3 from previous row. (24)
Finish here for a small motif.
Ch 3 (counts as first tr) turn.
Row 5:
1 tr in the same space as the turning ch.
Ch 2, sk 1 st, 1 tr in the next stitch, repeat to end of row finishing with 1 tr in the last stitch. (14)
Ch 3 (counts as first tr) turn.
Row 6:
1 tr in the first st.
3 tr in the ch 2 space, sk the next st. repeat to end of row finishing with 1 tr in the last stitch and 1 tr in the top of the turning ch. (37)
Ch 2
Row 7:
1 htr in the first st, 1 htr in each st until end of row. Finish with 1 htr in the top of the turning chain. (38)
Finish off and weave in ends to complete single motif or ch 1 and turn to add another motif as you go.

To add another motif as you go:
Row 1:
Dc 1 in the same space as the turning ch.
Dc 1 into the next 15 stitches (or dc in each stitch until you reach where you would like the centre beginning of your next motif).
Ch 3, sk one stitch and ss into the next stitch.
Ch 3 (counts as 1 tr), sk 2 sts and ss into the next stitch and turn.
Row 2:
11 tr into the first ch 3 gap, anchor the second motif to the first motif by slip stitching to the first motif at the end of the row (12).
Continue to create your joining motifs following the single motif pattern but anchor your motif at the end of each row.
Note: when you are anchoring your stitches to the previous motif it should be completed as following:
-
if you are doing double crochet then it will be in the next stitch along the previous motif.
-
if you are doing half treble crochet then you will skip one stitch and slip stitch into the next stitch along the previous motif.
-
if you are doing treble crochet then you will skip two stitches and slip stitch into the next stitch along the previous motif.

Single Motif US Version
Stitches Used:
ss - slip stitch
ch - chain
sk - skip stitch
st - stitch
sc - single crochet
hdc - half double crochet
dc - double crochet
Row 1:
Ch 5 and join with a ss to the first ch.
Row 2:
Ch 3 (counts as first dc), 11 dc into the ring, (12)
Ch 5 (counts as 1 dc & 2 ch) turn
Row 3:
1 dc, ch 2, repeat to end of row finishing with 1 dc in the last stitch. (12)
Ch 3 (counts as first dc) turn.
Row 4:
2 dc in each ch 2 space space, 1 dc in top of ch 3 from previous row. (24)
Finish here for a small motif.
Ch 3 (counts as first dc) turn.
Row 5:
1 dc in the same space as the turning ch.
Ch 2, sk 1 st, 1 dc in the next stitch, repeat to end of row finishing with 1 dc in the last stitch. (14)
Ch 3 (counts as first dc) turn.
Row 6:
1 dc in the first st.
3 dc in the ch 2 space, sk the next st. repeat to end of row finishing with 1 dc in the last stitch and 1 dc in the top of the turning ch. (37)
Ch 2
Row 7:
1 hdc in the first st, 1 hdc in each st until end of row. Finish with 1 hdc in the top of the turning chain. (38)
Finish off and weave in ends to complete single motif or ch 1 and turn to add another motif as you go.
To add another motif as you go:
Row 1:
Sc 1 in the same space as the turning ch.
Sc 1 into the next 15 stitches (or sc in each stitch until you reach where you would like the centre beginning of your next motif).
Ch 3, sk one stitch and ss into the next stitch.
Ch 3 (counts as 1 dc), sk 2 sts and ss into the next stitch and turn.
Row 2:
11 dc into the first ch 3 gap, anchor the second motif to the first motif by slip stitching to the first motif at the end of the row (12).
Continue to create your joining motifs following the single motif pattern but anchor your motif at the end of each row.
Note: when you are anchoring your stitches to the previous motif it should be completed as following:
-
if you are doing single crochet then it will be in the next stitch along the previous motif.
-
if you are doing double treble crochet then you will skip one stitch and slip stitch into the next stitch along the previous motif.
-
if you are doing double crochet then you will skip two stitches and slip stitch into the next stitch along the previous motif.

I continued adding motifs until I was happy with the length and shape of my scarf. Some were added randomly and placed along the sides not just on top of each other. You can be quite uniform with the placement of your motifs or just get creative and allow it flow and grow!
You are welcome to share the pattern, however please acknowledge that the design belongs to Yarn Me Calm respecting my rights as a designer, thank you!
If you have questions about this pattern, please contact me at
I hope you enjoy the pattern!
Andrea x
1 comment
Thanks for this pattern Andrea. I love it.