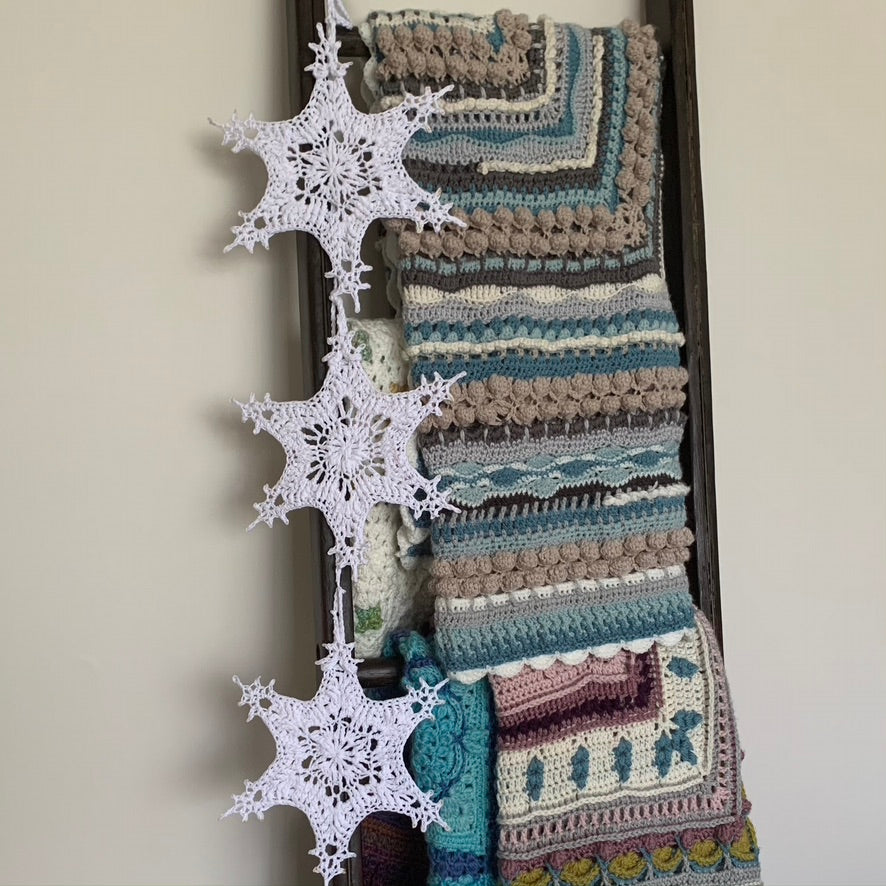
Snowy Stars
Andrea Clements
I often have random pattern ideas 'pop' into my head, sometimes I do something with them, sometimes not! On those occasions I decide to follow through with the idea I don't always remember to write down what I have done. I would like to say that I am going to try harder to translate ideas to reality and reality to something everyone else can access but honestly, I just can't promise as life often gets in the way!
However this was one of those times that I was able to follow through!
I'm not exactly sure how and when the first idea of the snowflake came about but I think it was actually several years ago. I think initially I was just going to make some snowflakes for Christmas Tree decorations. As I often do, I started making with a vague concept in mind and the snowflake grew from there. Once I had made one though, I thought they would be great not just as tree decorations but also as wall hangings and/or bunting.

I know I keep referring to them as snowflakes but they are called Snowy Stars. That's because the gorgeous Mr. YMC kept saying they look more like stars than snowflakes! I think they are snowflakes, he thinks they are stars...as Snowy Stars they can be both or either!
I used some gorgeous Fiddlestick Wren 8ply 100% cotton in White for my Snowy Stars. If you use a finer yarn your snowflakes will turn out smaller than mine.
One ball of Wren easily made 3 snowflakes and cord with a little left over!
Thank you to the lovely Wendy who tested the pattern for me xx
What you'll need:
- Fiddlesticks Wren White 002 (or other 100% cotton)
- Aleene's Fabric Stiffener & Draping Liquid
- 4mm Crochet Hook
- Scissors
- Stitch Markers
- Wool needle for weaving in ends
- Pins (depending on how many Snowy Stars you are blocking at a time - you need 30 pins per Snowy Star).
- Foam mat (or something else that you can pin out your Snowy Stars on)
- Plastic wrap or bags (preferably recycled!)

UK terms used throughout.
Stitches Used:
sk - skip stitch
ss - slip stitch
tr - treble crochet
ch - chain
htr - half treble crochet
dc - double crochet
dbtr - double treble crochet
fptr - front post treble crochet
bptr - back post treble crochet
fpdtr2tog - front post double treble 2 together
Instructions for front post double treble two together (fpdtr2tog).
Yarn over twice and insert your hook from front to back around the post of the next stitch. 
Yarn over and pull up a loop, there should be 4 loops on your hook. Yarn over and pull through 2 loops.
Yarn over and pull through 2 loops, there should now be 2 loops on your hook.

Yarn over twice and insert your hook from front to back around the post of the next stitch.

Yarn over and pull up a loop. There should be 5 loops on your hook.

Yarn over and pull through 2 loops, there should now be 4 loops on your hook.
Yarn over and pull through 2 loops, there should now be 3 loops on your hook, yarn over and pull through the last 3 loops.

This stitch gives a really nice raised 'v' and helps to start creating the points for our Snowy Stars.
One Snowy Star:
I haven't stated to use your stitch marker throughout the instructions, however if it helps pop a stitch marker in the first stitch of each round so you don't miss that first stitch!
Start with a Magic Ring.
Round One:
- ch 3 (counts as 1 tr), 1tr into the ring, ch 1.
- 2 tr ch 1 into the ring repeat 4 more times and join with a ss to the first st
(12 tr & 6 ch spaces)
Round Two:
- ch 2 (counts as first htr), 2 htr in the space between the tr from round one (not the chain space), ch 1
- fpdtr2tog over the next 2 tr (skipping the ch 1 sp) ch 1
- 3 htr in the space between the tr from round one,ch 1, fpdtr2tog over the next 2 tr (skipping the ch 1 sp) ch1. Repeat four more times, join with a ss to the first st.
(18 htr & 6 fpdtr2tog)
Round Three:
- ch2 (counts a 1htr), 1 htr into the next 2 st, ch 2.
- 1 dc into the top of the fpdtr2tog from round two, ch 3, 1 dc into the same space,
- ch 2 1htr into the next 3 st ch 2, 1 dc into the top of the dtr2tog from round two, ch 3, 1 dc into the same space. repeat four more times and join with a ss into the first st.
(18 htr, 12 tr, 42 ch)
Round Four:
- ch 1 (counts as first dc), 1 dc in the next 2 st, 2dc in the ch space,
- in the 3ch space 1htr, 1 tr, 1dbtr, 1 tr, 1 htr, 2dc in the ch space.
- 1dc in the next 3 sts, 2 dc in the ch space, in the 3 ch space 1 htr, 1 tr, 1dtr, 1 tr, 1 htr, 2 dc in the ch space, repeat four more times and join with a ss to the first st.
(42 dc, 12 htr, 12 tr, 6 dtr).
The snowflake doesn't sit flat after this round but don't worry it sorts itself out over the next couple of rounds!
Round Five:
- 1 fptr around each of the 3 htr from round three
- 1 bptr around the first post created by the ch 3 in round three (see picture below)

- sk 2 sts, 1fptr round the next 2 sts. 1 tr, 1 dbtr, 1 tr in the top of the next st
- 1fptr round the next 2 sts, 1 bptr around the second post created from the ch 3 in round three, sk 2 sts.
- Repeat 5 more times and join with a ss to the first st.
((12 bptr, 12 tr, 6 dbtr, 30 fptr)
Round Six:
- 1 fphtr around the next 3 st, 1 dc in the space before the next st, sk next st, 1 dc in the space before the next st. 1 fphtr around the next 3 st
- 1 dc in the space before the next st, ch 4, 1 dc in the 3rd ch from the hook, ch 1, sk 1 st, 1 dc in the space before the next st.
- 1 fphtr around the next 3 sts.
- 1 dc in the space before the next st, sk next st, 1 dc in the space before the next st.
- Repeat 5 more times and join with a ss to the first st.
(54 htr, 42 dc, 30 ch)
This round should have created two spaces at each peak, one smaller and one larger (see picture below).

Round Seven:
- 1dc in the next 3 st.
- Sk the next 2 st, 1dc in the next 4 st.
- 1 dc in the next space (the bottom larger space at the top of the peak), ch 2 ss in the second chain from the hook 1 dc in the same space.
- 1 dc in the next space (the top smaller space at the top of the peak), ch 2 ss in the second chain from the hook 1 dc in the same space. ch 3 ss in the second ch from the hook, ss in the 3rd ch from the hook. 1 dc in the same space, ch 2 ss in the second chain from the hook 1 dc in the same space
- 1 dc in the next space (the other side of the bottom larger space at the top of the peak) ch 2 ss in the second chain from the hook 1 dc in the same space.
- 1 dc in the next 4 st (the first stitch might be hidden),
- sk the next 2 st,
- Repeat 5 more times and join with a ss to the first st.
(114 dc, 66 ch, 36 ss - not counting the final ss to close the round).
Finish off and weave in ends.
The Cord:
There is a little video available that I made for The Myshelle Bag to help understand how to make the cord. It is a little bit fiddly to start with but works up quickly and is a brilliant little addition to your crochet toolbox!
- Using both yarns together create a loop on your hook.
- *Using colour 1, yarn over front to back, using colour 2 yarn over back to front and pull through all loops on hook. You should have one loop on your hook in colour 2*. Repeat from * to * until cord reaches the length you need.
Blocking:
I didn't use my normal T pins for blocking the stars because of the Fabric Stiffener. I was concerned that it would cause damage to the pins so I used sewing pins instead. I covered my foam mat with some recycled plastic to protect the mat from the Fabric Stiffener as well.
I used some fabric stiffener diluted with some water and soaked my Snowy Stars before pinning them out to block and dry.

Finishing:
I made smaller lengths of cord to create the loops on my Snowy Stars. You could leave them just with the small loop and hang them as individual Snowy Stars.
For a wall hanging (or bunting) I made a longer length of cord and looped it through each of the shorter lengths (I knotted these as I went to keep the Snowy Stars at even spaces along the cord).
I decided to make mine into a hanging so created an additional loop at the end of the longer cord.

You are welcome to share the pattern, however please acknowledge that the design belongs to Yarn Me Calm respecting my rights as a designer, thank you!
If you have questions about this pattern, please contact me at
I hope you enjoy the pattern!
Andrea x
1 comment
Is there a way I can purchase the star pattern without reading it on the blog? Thanks