One of our sensationally talented Yarn Me Calm (YMC) Community members designed this gorgeous Scarf-Ette.
The lovely Samantha Murray (@thewoollymammothco on Instagram) gracefully offered to have her stunning design posted on The Calming Yarn Blog as a free pattern!
I am so excited to share this gorgeous make with you here!
I was so excited when she first let me know that I even offered to test making the Scarf-Ette, so now I have one of my own - YAY!!! One of our other sensational Yarn Me Calm Community Members, Simone Howes, also tested this gorgeous pattern (thanks Simone x).
I hope you all love this pattern as much as I do and it would be wonderful if you jumped on over to Samantha's Instagram page to show her your appreciation!
Samantha also makes gorgeous crocheted items for sale and you can find her on Facebook at https://www.facebook.com/thewoollymammothco/
Samantha's Scarf-Ette was Designed using:
100g Scheepjes River Washed (Sport - 4 ply).
and tested using:
150g Katia Cotton Merino Craft (Aran - 10 ply), by Andrea Clements
150g Lion Brand Comfy Cotton Blend & 8g Scheepjes Soft Fun used on border only (DK - 8ply), by Simone Howes.

Finished Scarf-Ette measures approximately 81 cm (32 inches) long x 23 cm (9 inches wide).
The pattern length is adjustable depending on yarn used and your preference.
To adjust alter the starting chains to multiples of 3 + 2.
US Terms used throughout.
Materials required:
- Yarn (see above for different amounts required)
- 3 Buttons,
- Crochet hook in a size corresponding to the yarn you have chosen.
- Scissors,
- Needle for sewing on buttons and weaving in ends!
Stitches and abbreviations used:
CH – chain
SC – single crochet
HDC – half double crochet
DC – double crochet
CS – camel stitch (see pictures for more information regarding this stitch)
SK – skip stitch
FPDC – front post double crochet
Camel Stitch.
This stitch is made into the loop below the ‘V’ of the stitch (not in the back or front loop). Picture 1 shows the V of the stitch from the top. Picture 2 shows the loop under the ‘V’ of the stitch. Camel stitch is made into this loop.
The ‘V’ of the stitch.

The loop under the ‘V’ of the stitch.

Completed camel stitch.

The ‘right side’ of your work.

R1: CH 132 plus 2, turn.
R2: HDC into the 3rd CH from the hook, HDC into every stitch, turn.
R3: CH 3, DC CS into each stitch ensuring you DC CS into the top of the CH from the previous row (see below for CS), turn.
R4: CH 3, FPDC in next stitch, (DC, FPDC across repeat), DC in top of final CH stitch from previous row, turn.
R5: CH 1, SC across, SC in top of final CH stitch from previous row, turn.
R6: CH 2, HDC across, HDC in top of final CH stitch from previous row, turn.
R7: CH 1, SC CS across, SC in top of final CH stitch from previous row, turn.
R8: CH4, SK 1ST stitch, DC in next stitch. Repeat CH 1, DC in the next stitch across, ending with a DC in top of CH from previous row, turn.
R9: CH 1, SC across, SC in top of final CH stitch from previous row, turn.
R10: CH 2, HDC into every stitch, turn.
R11: CH 3, DC CS into each stitch ensuring you DC CS into the top of the CH from the previous row (see below for CS), turn.
R12: CH 3, FPDC in next stitch, (DC, FPDC across repeat), DC in top of final CH stitch from previous row, turn.

R13: CH 1, SC across, SC in top of final CH stitch from previous row, turn.
R14: CH 2, HDC across, HDC in top of final CH stitch from previous row, turn.
R15: CH 1, SC CS across, SC in top of final CH stitch from previous row, turn.
R16: CH4, SK 1ST stitch, DC in next stitch. Repeat CH 1, DC in the next stitch across, ending with a DC in top of CH from previous row, turn.
R17: CH 1, SC across, SC in top of final CH stitch from previous row, turn.
Repeat rows 10-17 until you reach the desired width (approximately 23cm wide). I finished on Row 3 then SC around the entire Scarf-Ette to create a border.
Simone finished on Row 7 and had a finished size of 101cm (40 inches) x 20cm (8 inches).
At this stage you can choose to put buttons on your Samantha’s Scarf-Ette or leave it without.

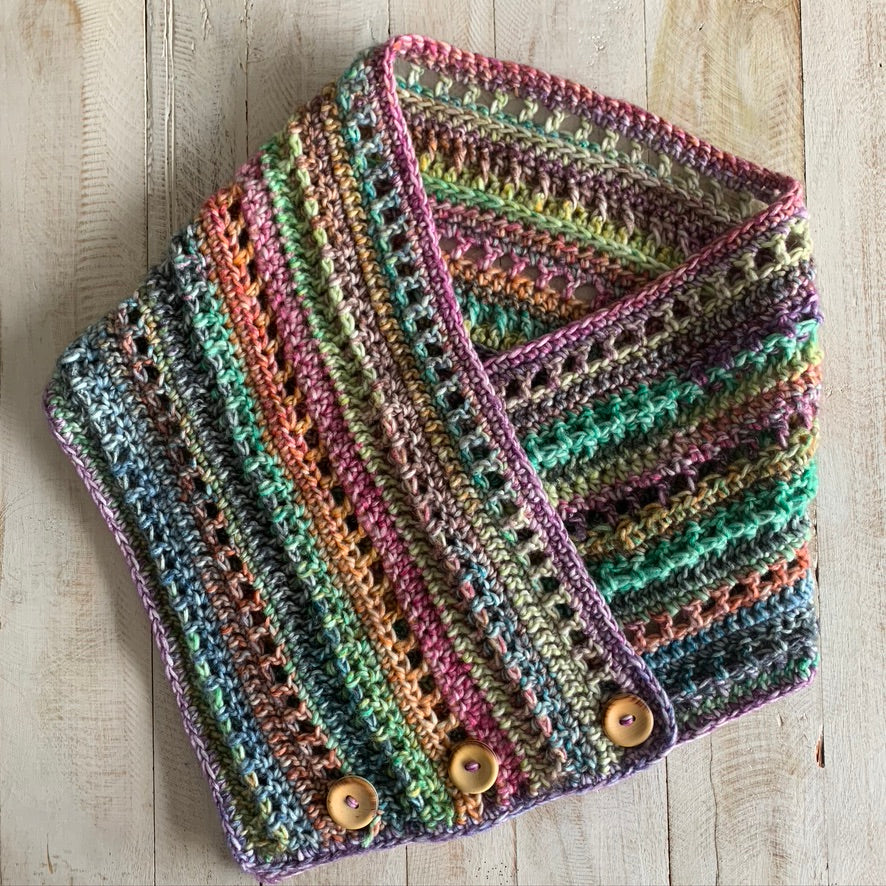
If you would like to use your Samantha’s Scarf-Ette as a cowl then fold your Samantha’s Scarf-Ette so the two ends come to a point (pictured).
Secure the buttons on your Samantha’s Scarf-Ette to correspond with the spaces and you have instant button holes!!!
You are welcome to share the pattern, however please acknowledge that the design belongs to Samantha Murray respecting her rights as a designer, thank you!
If you have questions about this pattern, please contact me at
Andrea x